can i draw in 3d glasses
An anaglyph effect is the proper name for the archetype 3D way where you have to wear cerise and blueish glasses to appreciate the content. Here, yous'll learn how to achieve the classic 3D effect using base images, shading and textures. Earlier you showtime, get yourself some costless textures to brand your design only the fashion you desire information technology.
The Bride', created in this tutorial, is an original slice that I created using a reference prototype equally the base of operations and employing the anaglyph effect. I often use this result in my work to explore themes of duality, and too to pay homage to B-movies of the '50s and '60s.
For more tutorials, see our Photoshop tutorials post.
01. Create the color palette
In order to accomplish the effect, I need to apply shades of blue and reddish. Information technology tin can work with other colours also, but these are the near traditional. Colour has been a challenge for me, especially in the digital medium, where literally any color y'all tin think of is at your disposal.
This colour palette was taken from a vintage 3D poster that I found at an antiques store. I took a photo of it and sampled the colours in Photoshop to create the palette. I've made some tweaks to information technology since, just I detect it works great with the 3D glasses which I ever send out with my print orders.
- Go Adobe Artistic Cloud here
02. Become the right reference prototype

Vintage advertising illustrations and photography give me endless inspiration. I love the idealised, dream-like and hopeful world in which these images take place.
For me, finding the correct reference epitome is key: I look for overall composition and facial expression. The reference paradigm is of import, but I always exercise a fair amount of editing in my sketches as I go. Near of the time I showtime seeing what will be happening in the nether-layer as I start to block in the drawing of the upper layer.
03. Draw the upper layer
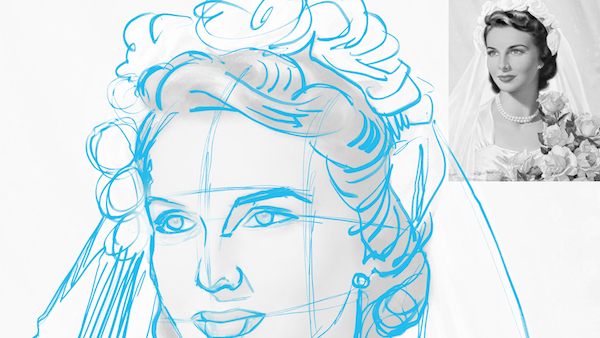
I block out the reference image to get the basic limerick. I find that it is really important non to direct trace over the pinnacle of the epitome – straight traces tin can sometimes feel stilted and emotionless. Working this way allows me to requite the drawing some motion. Once the epitome is blocked in, I move a pocket-size copy of the reference image to the corner of my canvas where I can see it hands.
04. Introduce linework

Next I digitally 'ink' the cartoon. Typically, all of my linework is done in ane go. Working in black and white helps ensure that I get the lines I want. I could, at this step, draw in a layer mask or ink in red, but that tends to slow me down.
05. Add together a layer mask
To color the linework, I like to create a solid colour layer (cherry-red). Then I make a layer mask where I will paste my linework. At this point I'll set it to Multiply and turn the opacity to around 20 per cent, just enough to see the red layer.
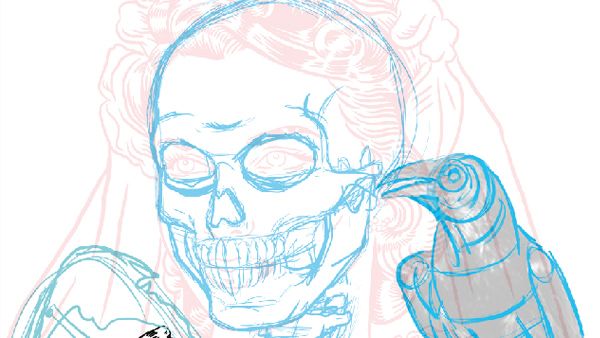
07. Sketch the nether-layer
Creating the under-layer is my favourite part of my process – this is where the piece really gets interesting. I unremarkably endeavor several different ideas and compositions. The skeleton is something I've fatigued loads of times, so I feel pretty confident cartoon information technology freehand. I will apply the faint upper layer as a guide.
For the crows and snakes, I utilize reference images the same way I did for the upper layer drawing (run across step 03). I ink them before moving on to the skeleton. That manner I can motility things around if the composition isn't working.
08. Define the effigy'due south ink
Once I'1000 happy with the limerick, I ink the remaining sketch and paste it into a mask, just as I did earlier.
09. Add shade and texture
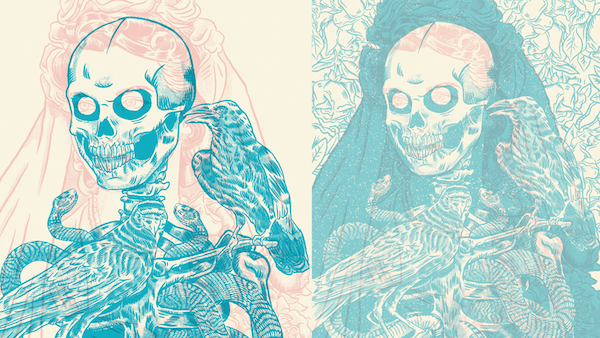
Now that I have my red and blue layers where I desire them, information technology's time to add together some shade and texture. I used to create my own custom brushes and textures for years, painstakingly scanning ink splatters and grainy textures.
Then I discovered True Dust Texture Supply and oasis't looked back. True Grit has some of the all-time impress-quality, loftier-resolution Photoshop brushes on the market.
10. Shade one layer at a time

While shading, I similar to focus on one layer at a time. This manner I know that each layer is solid on its own. On the red layer I'thousand using one of True Grit'due south half-tone shader brushes with 45-degree dots. I love how I tin can immediately accomplish a vintage halftone texture. On the blueish layer I use a 90-caste line one-half-tone brush, also from True Grit (I promise they aren't paying me…). All of this takes identify on the layer mask.
eleven. Add dust and texture
When the shading values are looking swell, it's time to add some dust and texture. My goal is to create a worn-in and rugged appearance that mimics weather damage.
I want the piece to experience similar it has been forgotten most or lost to fourth dimension. However, it's important that I don't become overboard on this step and that the distressing on both layers complement each other.
The opacity of the layers has been played with a lot at this betoken, so I want to make sure things look random and not too planned-out.
This article was originally published in result 296 of Figurer Arts, the world's best-selling design magazine. Purchase event 296 now or subscribe to Calculator Arts.
Read more than:
- 54 gratuitous Photoshop actions
- All the best complimentary Photoshop brushes
- 3D art: 28 astonishing examples to inspire you
Source: https://www.creativebloq.com/how-to/anaglyph-effect
0 Response to "can i draw in 3d glasses"
Enregistrer un commentaire